Showing posts with label Spoiled by Wet n Wild. Show all posts

Sunday, September 9, 2012

80's Earrings nail art #2

Hey guys! Remember this post from a few months ago? Well, I'm back with more!
 
Here is how they turned out:
 
 
And here are the earrings I was inspired by:

 
These earrings are my personal favorites from all the pairs that I found that day! They are so colorful and fun.
 
 
Here are the supplies I used for the details in the design:
 
For the fine line detailing I did with the pink and green I used two of my migi nail art pens, they have a super fine tip (see below) and are great for drawing lines. I used my nail art brush to do the turquoise swirlies and to paint the navy and turquoise sides at the bottom of the nail. Lastly, I used my dotting tool for the dots.


Here's a quick step by step on how I did these nails:
 
I started with two coats of Spoiled by Wet n Wild Designated Driver

Then, using my nail art brush, I first painted the left side of my nail, about half way down, with a navy polish (Avon Empower). I painted the right side with a turquoise polish (Chin Glaze Turned Up Turquoise) using the same technique.

Lastly, I went in and did the detailing. I used my nail art brush and the turquoise polish and did little swirlies at the top of each nail. I used my pink migi nail art pen to do the crooked line under the swirly. All the dots were done with a dotting tool. And the little green arrows you see on the left side of each nail were done with my lime green migi nail art pen.
WHEW, that was a lot to say, I hope I didn't lose anyone!
 
As you can see, I didn't do the EXACT design of the earrings.

If any of you ever attempt to do designs inspired by objects or other designs you see, just know it doesn't have to be perfect! You can see that some of my lines are wonky and stuff isn't placed exaclty so, but that's what adds to the appeal of these nails! And if you look closely, you can see that the earrings aren't perfect either!

These were really fun and crazy nails. I'd love to go to some 80's party or rave and re-create this look!


Saturday, June 30, 2012

Realistic giraffe stamping

As promised, here is my take on realistic giraffe print nails!!

Here's what I used:

L to R: OPI Bronzed to Perfection, Spoiled by Wet n Wild Designated Driver, Milani Dark Coffee 

I started with one coat of Bronzed to Perfection and then sponged on Designated Driver until I was satisfied with the color of the base. I used Dark Coffee for the stamp with Bundle Monster plate BM-215.

Yay giraffe nails!!!


I can't decide if I like these or the snake skin nails better?! They both turned out perfect!

These nails make me want to go visit the zoo near where I live and feed the giraffes!


Here are some pics from April 2011 when I was at the zoo!

It's so awesome how close they get and you can pet them! I just love giraffes!


Thursday, June 7, 2012

Neon/Striping Tape fun!

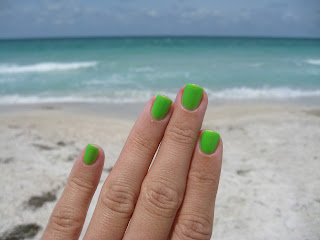
A few nights ago I decided to paint my nails a fun neon color. This was still when the weather was perfect and I was soaking up the sun. On Tuesday, the weather decided to turn to shit here in FL and I haven't had any good beach days since :( Maybe posting my fun neon nails will make the sun come back tomorrow!!

I started with two coats of Spoiled I'm so Jaded, as my base. This beautiful polish is neon lime green with gold/yellow shimmer.
I decided to buy this polish back when Steph, from Imperfectly Painted, featured it on her blog in this post. I don't normally wear greens, but this I am in love with.
A gorgeous beach day to show off my neon nails <3 (I want this weather back now!!)
Then I spruced up this mani by doing some cool stripes on my thumb and ring finger using my new striping tape (which I'll talk about below) and China Glaze Flip Flop Fantasy!

I just placed the tape in the design that I wanted and painted one thick coat of Flip Flop Fantasy over it and peeled the tape off while the polish was still wet! I loved the effect.
Here is the striping tape that I am talking about...it's very thin tape that comes in pretty colors. I've seen some awesome manis where girls leave the tape on for stripes, as well as using it to create crisp lines, like I did.
I bought a pack of 10 of these on ebay for $0.99 with no shipping charges!! The pack came with silver, gold, white, blue, red, purple, etc!


I'm really excited to create tons of cool nail designs with this stuff! Stay tuned :)

Thursday, May 10, 2012

Soft Shade Love!

I used the rest of my OPI NYC Ballet collection! And I paired them with some really pretty glitters...wanna see?! OK!

OPI Barre My Soul sandwiched with Sally Hansen Jewel Overcoat Ring-a-Ding!

I started with three coats of Barre my Soul and then one coat of Ring-a-Ding and topped it off with another coat of Barre my Soul. Everytime I look at my nails they remind me of cotton candy. I love this look!

Ring-a-Ding is gold, copper, and rose colored hex glitter! I almost didn't buy it because I thought it was just another gold hex glitter, but I took a closer look and saw the three different shades. It's really pretty!


OPI You Callin' Me a Lyre? with Spoiled Jewelry Heist on top.

I did four coats of YCMAL first and then topped it with one coat of Jewelry Heist.
So, the first one reminded me of cotton candy and this one reminded me of cupcakes lol I think maybe I think about food too often haha!

Just like Ring-a-Ding, I almost passed Jewelry Heist up also. Then someone on instagram posted a mani with it and I was like, I need this polish! lol


OPI Care to Danse? with Sally Hansen Jewel Overcoat White Veil on top!

Care to Danse? took five coats to be opaque and then I did one coat of White Veil.  These OPIs dry fairly quickly so it really doesn't bug me that they need a lot of coats. I'm in love with them!

This combo was so elegant!


Any of you into the Jewel Overcoats and soft shades like I am?!